
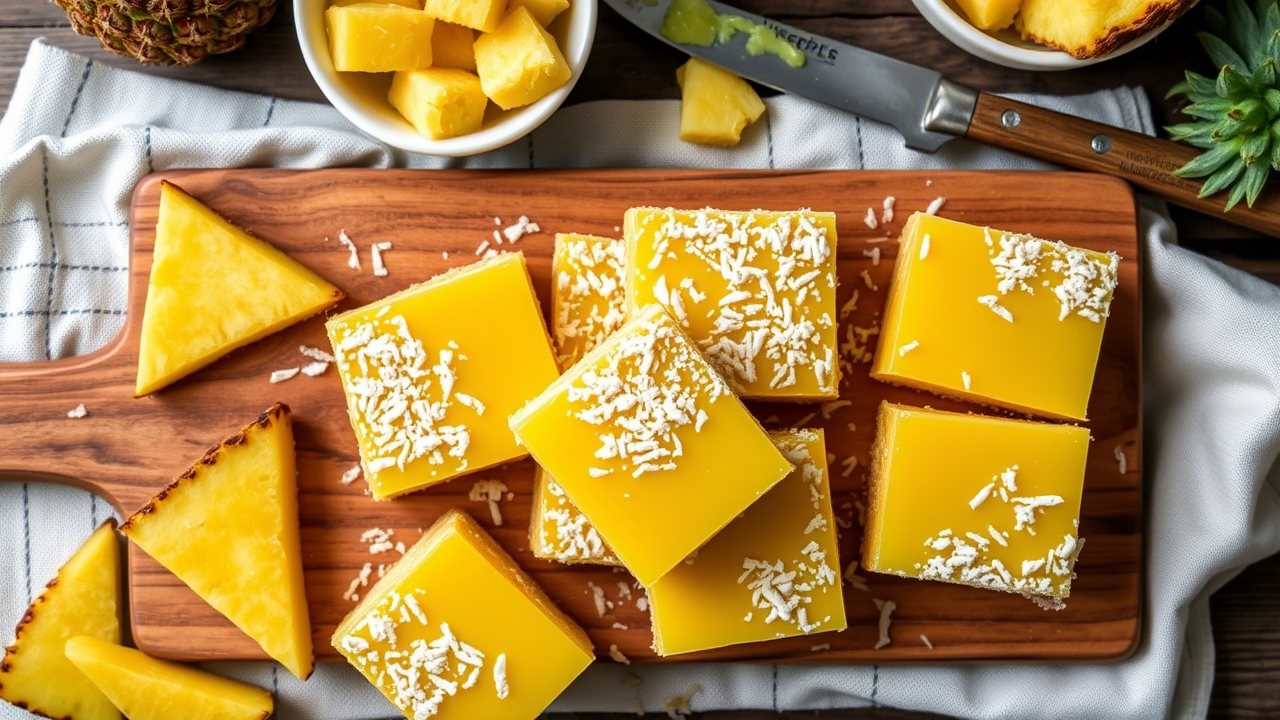
You know that moment when the scent of caramelized pineapple wafts through a warm kitchen and everything just feels right? Yeah, that’s the magic of Tropical Pineapple Bliss Bars. These aren’t just another spin on lemon bars. These are sun-drenched little squares of joy—where buttery shortbread collides with a lush, tangy pineapple filling.
If you’re a professional pastry chef, a serious home baker, or someone running a small bakery, this recipe isn’t just cute—it’s marketable, it’s versatile, and it’s profitable. Let’s dive in, not just with a whisk but with the kind of insight that takes sweet treats from basic to best-seller.
The Flavor Equation: Why Pineapple?
Pineapple is a tropical fruit with a natural sugar-acid balance that’s ideal for dessert development. Its high bromelain content gives it a light enzymatic edge that enhances other ingredients—especially fat-based ones like butter and cream.
Compared to lemon, pineapple has a lower acid profile (pH around 3.2–4.0 vs lemon’s 2.0), but what it lacks in sharpness it makes up in depth. It adds more body, more “roundness.” That means when you’re building a dessert like a Bliss Bar, you’re creating something smoother, silkier, and less jarring on the palate.
A buttery shortbread base is the perfect contrast. You’ve got this sweet-tart, syrupy filling perched on top of something delicate and flaky. It’s like serving a piña colada on a porcelain plate.
Understanding Shortbread: It Ain’t Just Butter + Flour
A real shortbread base needs attention. Not just ratios, but behavior.
Professional kitchens often use a 1-2-3 ratio for shortbread: 1 part sugar, 2 parts butter, 3 parts flour. But for bars that need structure—something that can survive slicing, wrapping, even shipping—you need more than textbook balance.
Try this modified ratio:
- 1 part superfine sugar
- 2.25 parts unsalted European-style butter (82–85% fat)
- 3 parts all-purpose flour + a touch of cornstarch
Cornstarch gives it a meltier crumb and a slightly sturdier bite. Just 1–2 tablespoons is enough for a full sheet pan batch. You’re not trying to make a shortcake here, you’re engineering an edible plate.
Also, don’t skip the chilling step. Press the dough into your lined pan, dock it, and freeze it for 20 minutes before baking. It reduces spread, improves browning, and ensures a cleaner snap.

Building the Pineapple Filling: It’s All in the Chemistry
The pineapple filling isn’t a dump-and-stir. This is where most people screw up, even at a pro level.
If you’re using canned crushed pineapple, make sure it’s packed in juice, not syrup. You want that real fruit flavor, not sugar-water. Strain it—but not all the way. You want some moisture, but not so much that it sogs the base.
Then there’s the thickening agent. Cornstarch works, but it’s temperamental when reheated. Flour’s okay, but it muddles flavor. The best? A blend.
My go-to professional mix:
- 1.5 tablespoons cornstarch
- 1 tablespoon tapioca starch
- Pinch of xanthan gum (seriously—just 0.2g in a batch adds insurance)
This blend gives you a clear, glossy, jammy filling that sets up firm without turning gluey.
Now, add eggs—whole ones. No yolk-only tricks here. The whites give structure. Also, don’t skip the salt and the vanilla. Salt balances the tartness. Vanilla brings out those caramel notes from the baked pineapple.
And here’s a weird pro-tip: A teaspoon of coconut milk powder folded into the filling? Transforms the whole vibe. Makes it feel like a vacation in your mouth.
Step-by-Step Assembly (for High-Volume Kitchens)
- Prebake the shortbread crust at 350°F (177°C) for 18–22 minutes until just golden. Dock it generously before chilling so it bakes flat.
- While it cools slightly, whisk together the pineapple, eggs, sugar, starch blend, salt, and vanilla until smooth and emulsified.
- Pour the filling gently onto the warm crust. This helps the bottom layer slightly bond to the curd—no lifting when slicing.
- Bake again at 325°F (163°C) for 22–26 minutes until set with just the slightest wobble.
- Chill completely before slicing. Preferably overnight. It sets cleaner and develops flavor.
Want cleaner edges for retail presentation? Freeze the bars for 30 minutes before slicing with a hot knife.
Advanced Variations for Professionals
Want to charge more per square inch? Dress it up.
- Macadamia Nut Crust: Add crushed roasted macadamias to your shortbread dough.
- Pineapple-Passion Layer: Blend passionfruit purée (10–15%) into the pineapple base. Tart, floral, unforgettable.
- Coconut Topping: Add a toasted coconut meringue top layer—baked or torched. Offers texture and eye appeal.
In a bakery case, visual contrast matters. Consider a light dusting of powdered sugar through a pineapple-shaped stencil or a tiny dehydrated pineapple wedge as a topper.
Shelf Life, Storage, and Profit Margins
Shelf life in refrigeration is 5–6 days. Flavor peaks at Day 2. Flash freezing? Totally fine. Wrap tightly and it’ll keep for up to 2 months. Thaw overnight in the fridge, not on the counter. You’ll avoid condensation that way.
Let’s talk pricing. Cost of goods for a batch yields approximately 24 bars in a standard 9×13 pan. Average cost per bar (including packaging) is around $0.65–$0.80 USD. Retail price? $3.00–$3.75 depending on market. That’s a healthy 70% margin.
Add-ons like toasted coconut or white chocolate drizzle increase perceived value without raising costs too much. Easy upsell.
Common Missteps That Kill the Bar
- Soggy Bottoms: Usually means the crust was underbaked or the filling was too wet. Strain your pineapple. Chill your crust.
- Overbaking the Filling: Pineapple contains enzymes that can curdle eggs if the mix gets too hot. Keep it gentle. Low and slow is better.
- Runny Slices: Didn’t chill long enough. That center needs time to firm up post-bake. Patience is part of the recipe.
Science Says: Pineapple Deserves More Love
Pineapple contains bromelain, an enzyme complex that breaks down proteins. In desserts, this can soften baked goods over time—especially in fruit-studded cakes or bars. But here’s the kicker: cooked or canned pineapple has denatured enzymes, so it won’t break down the structure of your bar.
That’s why this dessert is stable for prep-ahead. It won’t collapse or ooze on Day 3.
And nutritionally? Pineapple’s no slouch. It’s got vitamin C, manganese, and trace amounts of thiamin and B6. Not a health food, sure—but a better base than corn syrup and food coloring.

Case Study: From Bakery Special to National Hit
A small bakery in Maui—Kō Bakery—started selling pineapple bars as a weekend special. Within 3 months, it became their top-selling item. They scaled it to include macadamia nuts, and then a chocolate-dipped version for holidays. Now it ships nationally in refrigerated packaging.
The lesson? It’s not just about the recipe. It’s about flexibility, branding, and making it yours.
Wrapping It Up (and Your Bars Too)
Tropical Pineapple Bliss Bars aren’t just a sweet treat. They’re a scalable, high-margin, customizable product that works for pros. From a street-side bake stand to a commercial kitchen, this dessert has legs.
Shortbread gives structure, pineapple brings the punch, and if you do it right—you’ll create something that looks simple but eats like a dream.
Actionable next steps?
- Test three starch combos to find your ideal texture.
- Freeze-cut a batch to trial new packaging.
- Create one premium variant—passionfruit, coconut, or macadamia.
- Do a side-by-side with lemon bars and gather real customer feedback.
Because if your pineapple bar tastes like sunshine and your shortbread breaks like sand under your teeth… well, you’ve got something more than dessert.
You’ve got a signature.
FAQs
What makes Tropical Pineapple Bliss Bars different from lemon bars?
They’re smoother, less tart, and packed with tropical flavor thanks to pineapple’s natural sweetness and depth.
Can I use fresh pineapple instead of canned?
Yes, but cook it down first to reduce moisture and neutralize enzymes that could affect texture.
Why is chilling the crust before baking important?
It prevents spreading and ensures a crisp, even base.
How do I keep the filling from turning runny?
Strain your pineapple and chill the bars overnight after baking.
What starch blend gives the best filling texture?
A mix of cornstarch, tapioca starch, and a tiny bit of xanthan gum works best.
Can these bars be made ahead and frozen?
Absolutely—just wrap tightly and freeze for up to 2 months.
What’s the ideal way to slice for clean edges?
Freeze briefly, then slice with a hot, clean knife for perfect cuts.
Are these bars suitable for bakery display?
Yes, they hold up well, look vibrant, and offer great shelf appeal.
How long do Tropical Pineapple Bliss Bars last in the fridge?
They stay fresh for 5–6 days, with flavor peaking on Day 2.
What’s a good twist to elevate the recipe?
Try adding passionfruit purée, toasted coconut, or macadamia nuts.

Mariana is a passionate home cook who creates delicious, easy-to-follow recipes for busy people. From energizing breakfasts to satisfying dinners and indulgent desserts, her dishes are designed to fuel both your body and hustle.
When she’s not in the kitchen, she’s exploring new flavors and dreaming up her next recipe to share with the Foodie Hustle community.